Views and sections
Build the ticket queues in the inbox sidebar, decide who sees each one, group them into sections, and choose which built-in views each agent keeps in sight.
On this page
A view is a saved list of tickets: every ticket that matches its filter, sorted the way you set it. Views sit in the left sidebar of the inbox, each with a count of the tickets in it. A ticket shows up in every view whose filter it matches, so you never move a ticket into a view by hand. Change the ticket (its tags, team, status or anything else the filter checks) and it moves to the views that fit.
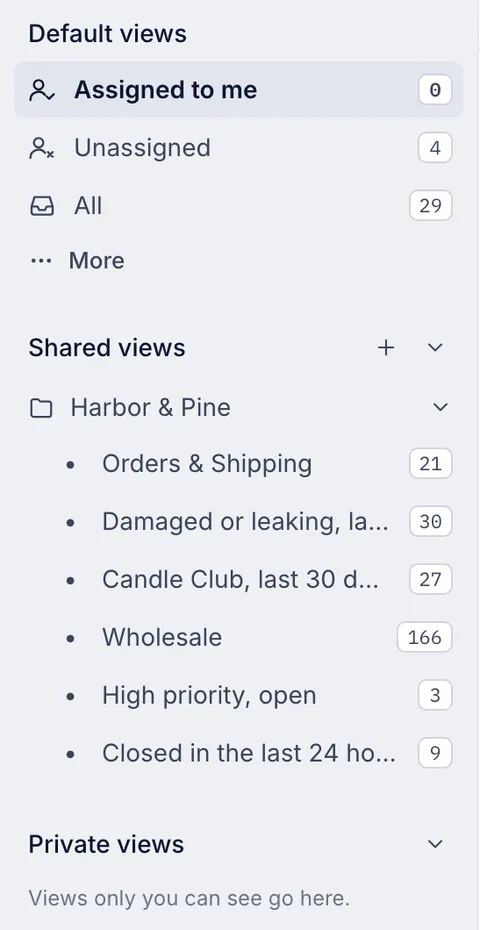
The three kinds of view#
| Kind | Where it shows | Who manages it |
|---|---|---|
| Built-in views | Default views, first in the sidebar | Nobody: they are the same in every helpdesk |
| Shared views | Shared views: seen by everyone, or by the agents and teams you choose | Lead agents and admins |
| Private views | Private views: seen only by the agent who made it | Lead agents and admins, for themselves |
Agents, basic agents, lite agents and observers can open every view shared with them, but the view editor is read-only for them. Creating and changing views on screen needs a lead agent or admin. Haylee, the AI agent, can also create and edit views when you ask her to, but she cannot delete them.
Built-in views#
| View | What it lists |
|---|---|
| Assigned to me | Your open tickets |
| Unassigned | Open tickets with no agent |
| All | Every open ticket |
| Snoozed | Your tickets that are snoozed |
| Closed | Closed tickets |
| Spam | Tickets marked as spam |
| Trash | Tickets moved to the trash |
| All customers | Every customer: a list of people rather than tickets |
Assigned to me, Unassigned and All show in the sidebar; the rest wait under More. Each agent can choose which ones stay in sight: hover over Default views, select the sliders button (Choose which default views show) and tick the views you want. The choice is saved in that browser only.
Built-in views cannot be edited or deleted. To change the filter or columns, create a view of your own.
Create a view#
Hover over Shared views or Private views in the inbox sidebar and select +, or go to Workflows > Views and select Create view.
Enter a Name. Add an Emoji if you like; it shows before the name. The row of quick emoji fills it in with one click.
Choose a Section to group the view under a heading in the sidebar, or select New section to make one.
Under Who sees it, choose:
Everyone: every agent sees it under Shared views.
Only me: it shows under your Private views and nobody else sees it.
Chosen agents and teams: you, the agents you add under Agents and the members of the teams you add under Teams.
Build the Filter. Leave it empty to list every ticket that is not spam or in the trash. Filters for views and search lists every condition you can use.
Under Sort, choose what to Sort by and the Order, such as Last message, newest first.
Under Columns, tick what the ticket list shows for each ticket. They appear in the order you tick them, and every active ticket field is offered as a column too.
Select Save view.
The editor opens on Everyone, even when you start from Private views, so pick Only me for a private view.
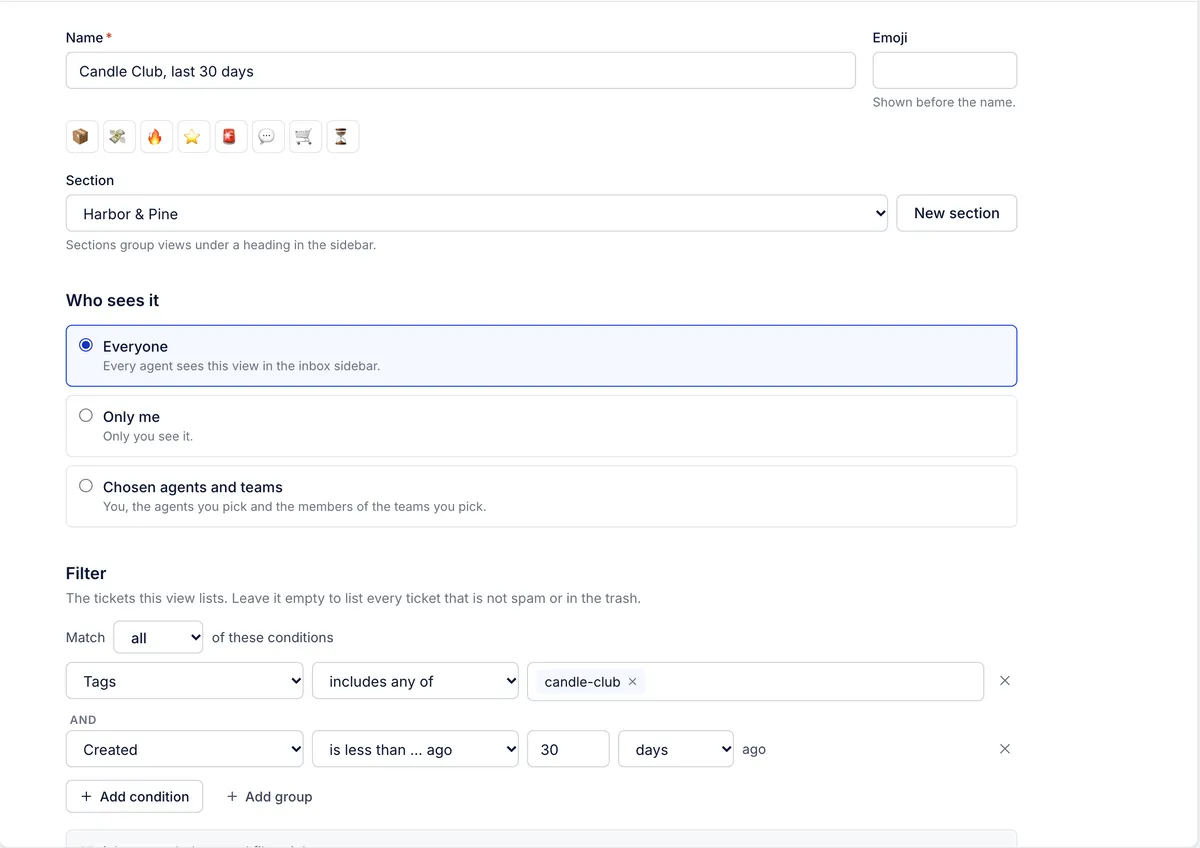
Once a view is saved, the editor shows how many tickets match its filter right now. A filter you have changed but not saved yet cannot be counted.
A shared view is visible only to the people it is shared with, admins included. If you share a view with chosen agents and teams and leave yourself out of both, you still see it because you made it.
Edit or delete a view#
Go to Workflows > Views and select the view. The page lists your views by section, with Visible to and Shows (the filter in words) for each, and the built-in views at the bottom. Use Search views by name to find one.
Change what you need and select Save view. To remove the view, select Delete. It leaves every agent's sidebar; the tickets in it are not changed.
Dragging views to reorder the sidebar is not available.
Sections#
A section is a heading in the sidebar that holds several views, such as "Social" for your Instagram and Facebook views. Unlike a view, a section has no filter: you decide which views go in it.
Create a section. On Workflows > Views, select Create section (or New section inside the view editor). Give it a Name and an optional Emoji. Tick Only I see this section to keep it to your own sidebar, under Private views.
Put a view in a section. Open the view and choose the section under Section.
Rename or delete a section. On Workflows > Views, use Rename or Delete beside the section's name. Deleting a section keeps its views; they move out of the section.
Agents can fold a section in the sidebar by selecting its name.
Views worth making#
Start with the queues your team actually works, and give each one an owner. A few that suit most stores:
| View | Filter |
|---|---|
| Order status, open | Status is Open, and Tags includes any of order-status |
| Chat first | Channel is Chat, and Status is Open |
| Urgent and nobody on it | Priority is one of High and Critical, and Assignee is not set |
| Waiting over 4 hours | Status is Open, and Last message from the customer is more than 4 hours ago |
| Started by your team | Started by an agent is Yes, and Status is Open |
| Refunds team | Status is Open, and Team is Refunds |
| Unhappy customers | Satisfaction score is at most 2 |
Name views after the work they hold ("Order status, open") rather than after a person, and keep personal working lists as private views so the shared list stays short.
Related articles
- Filters for views and searchEvery condition a view's filter can use, what each operator means, and how to combine conditions with all, any and groups.
- The inbox: views, the ticket list and the ticket panelWhat each part of the inbox shows, what the built-in views contain, how the ticket list sorts and refreshes, and the two list layouts.
- TagsLabel tickets by topic so views, rules, macros and reports can find them, and keep the tag list tidy with descriptions, colours and merges.
- TeamsGroup agents into teams so tickets, views and reports can follow how your support team is really split, then add, remove or delete members.
Still stuck?
Write to the Growth Dept team and a person answers. Say which helpdesk you work in and what you were trying to do.