In this guide
The video series#
Eleven short videos cover the helpdesk, numbered the way the playlist runs: a first look, then Haylee's skills and actions, the AI reports, then ticket fields, tags, macros and rules, and three walkthroughs. Each one also sits in the section of this guide where its topic comes up. Videos that are still being made say so and appear here once they are published.
 1. A quick tour of Growth Dept Helpdesk
. The menu, views, the ticket list, a ticket and its sidebar, and a reply with a macro.
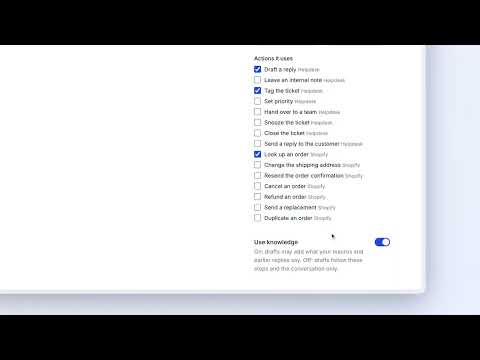 2. Skills for Haylee, your AI agent
. Writing a skill, switching it on, and reading the ones Haylee drafts.
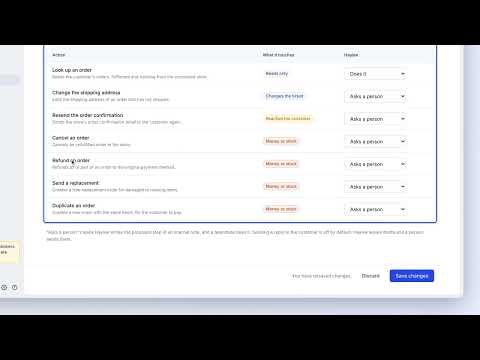 3. Actions for Haylee
. What Haylee may do on her own, what she asks a person to do, and what stays off.
 4. Analytics for AI and automation
. The AI agent report (drafts written and used, the skills behind them, what Haylee changed) and the Automation report.
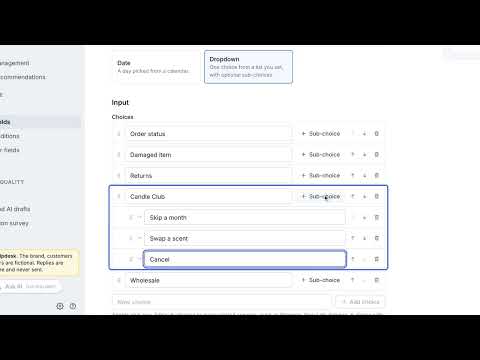 5. Setting up ticket fields
. Field types, dropdown choices, required fields, conditions, and fields in macros and rules.
 6. Setting up tags
. Planning, creating, merging and using tags in rules, macros, views and reports.
 7. Creating macros
. Naming a macro, writing the reply with variables, adding actions and applying it on a ticket.
 8. Creating rules
. Rule order, When, If and Then, starting from a template, and the code view.
- Video comingUsing Growth Dept Helpdesk day to day: a full walkthrough
Using Growth Dept Helpdesk day to day: a full walkthrough. A working session from the first ticket of the day to the last one closed.
- Video comingHaylee builds it for you
Haylee builds it for you. Asking Haylee in Slack for macros, rules, tags and fields, and checking what she made.
- Video comingHow Haylee works in your helpdesk
How Haylee works in your helpdesk. Haylee's own account and key, her drafts, notes and skills, and where to review them.
What the helpdesk is#
Growth Dept Helpdesk is where your store's customer conversations land and get answered. Email from your support address, chat on your store, contact forms and help center messages all arrive as tickets in one shared inbox. Each ticket shows who wrote in, what they ordered from your Shopify store and what your team has already told them, so you can answer without switching tabs.
You will use six areas. To move between them, click the name of the area you are in (top left, with an arrow beside it) and pick another:
| Area | What you do there |
|---|---|
| Inbox | Read and answer tickets, organized into views |
| Customers | Look up a customer, their past tickets and their orders |
| AI Agent | Write the skills that drafted replies follow, and see what Haylee, the AI agent, may do |
| Analytics | See volume, response times and satisfaction scores |
| Workflows | Set up macros, rules, tags, ticket fields and views |
| Settings | Your profile, notifications, users, teams, channels and the store connection |
Video 1 in the series above, the two-minute tour, walks through the same screens.
Go further: What Growth Dept Helpdesk is · Launch checklist for admins · Moving from Gorgias
Signing in#
Your helpdesk owner or an admin invites you by email. The invitation names the person who invited you and the team you are joining, and its link works for 48 hours. Open it and either choose Continue with Google with the Google account for the invited address, or set a password. Owners always sign in with Google.
After that, sign in at cs.growthdept.ai/login the same way. If you forget your password, Forgot your password? on the sign-in page emails you a link to set a new one.
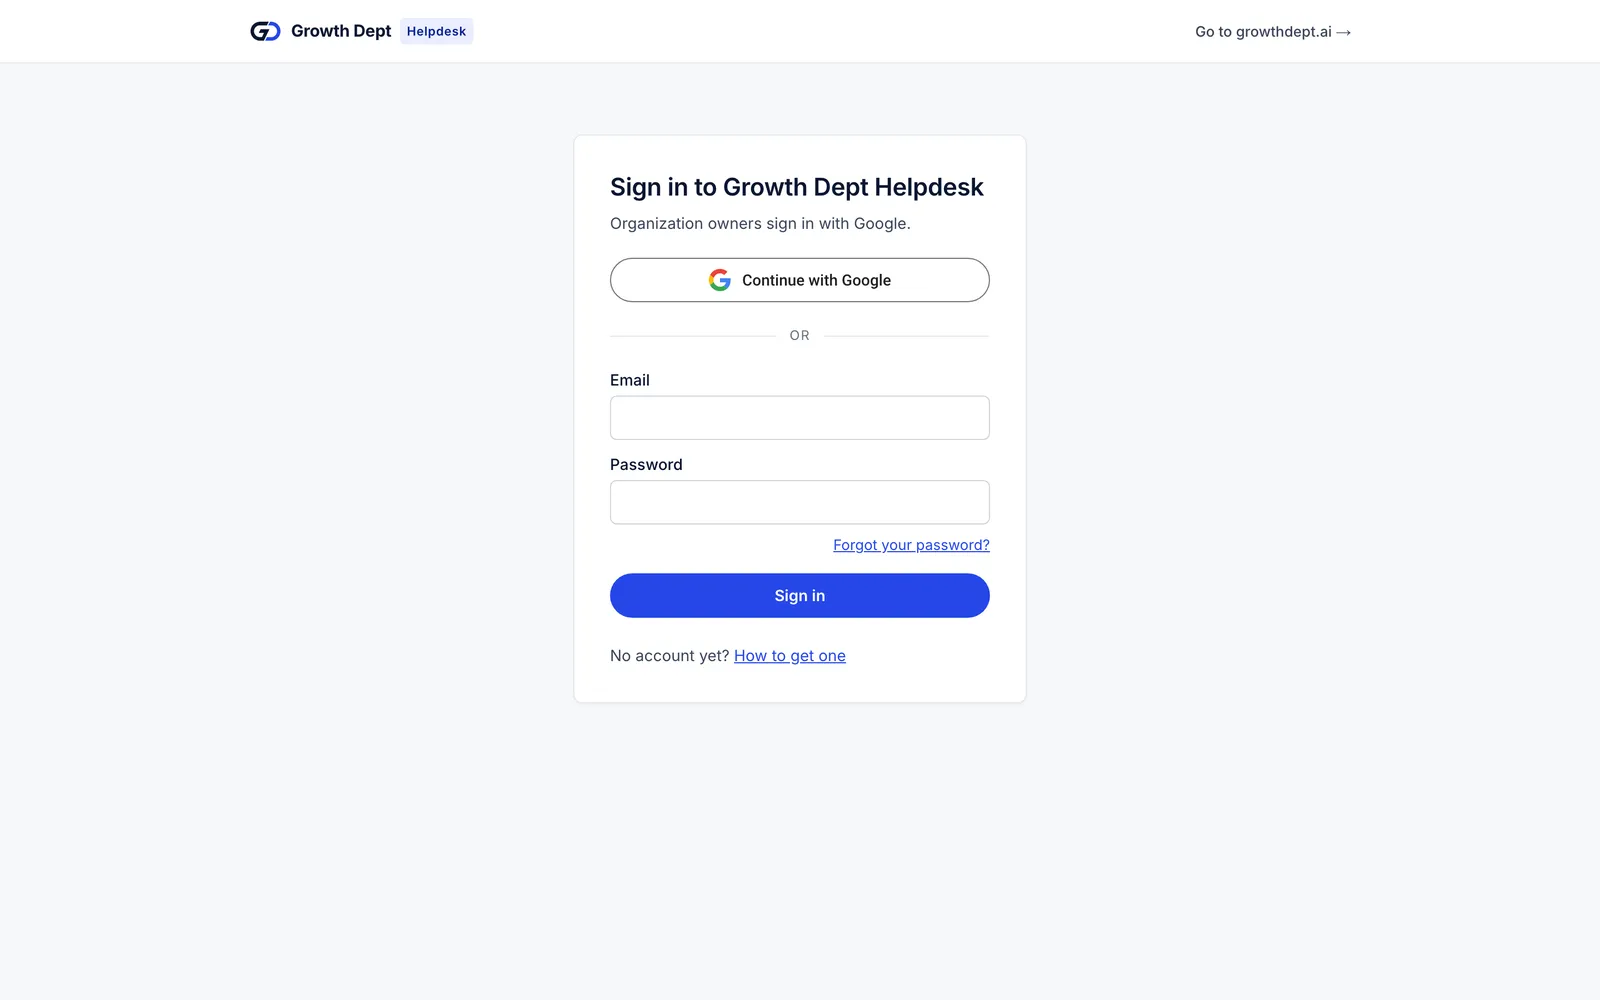
If you work in more than one helpdesk, you first see a list of them; pick the one you want. Switch between them later from that same area menu.
Go further: Sign in and fix sign-in problems · Invite your team · Roles · Two-step sign-in
The inbox and views#
The inbox has three columns: views on the left, the tickets in the chosen view in the middle, and the open ticket on the right.
A view is a saved list of tickets. Every helpdesk has these built in:
Assigned to me: your open tickets. Most of your day happens here.
Unassigned: open tickets nobody owns yet. Pick work up from here.
All: every open ticket.
Under More: Snoozed (your snoozed tickets), Closed, Spam and Trash.
Below them are shared views your team made, grouped into sections (for example "Orders & Shipping" or "High priority, open"), and private views that only you can see. The number next to each view is how many tickets it holds.
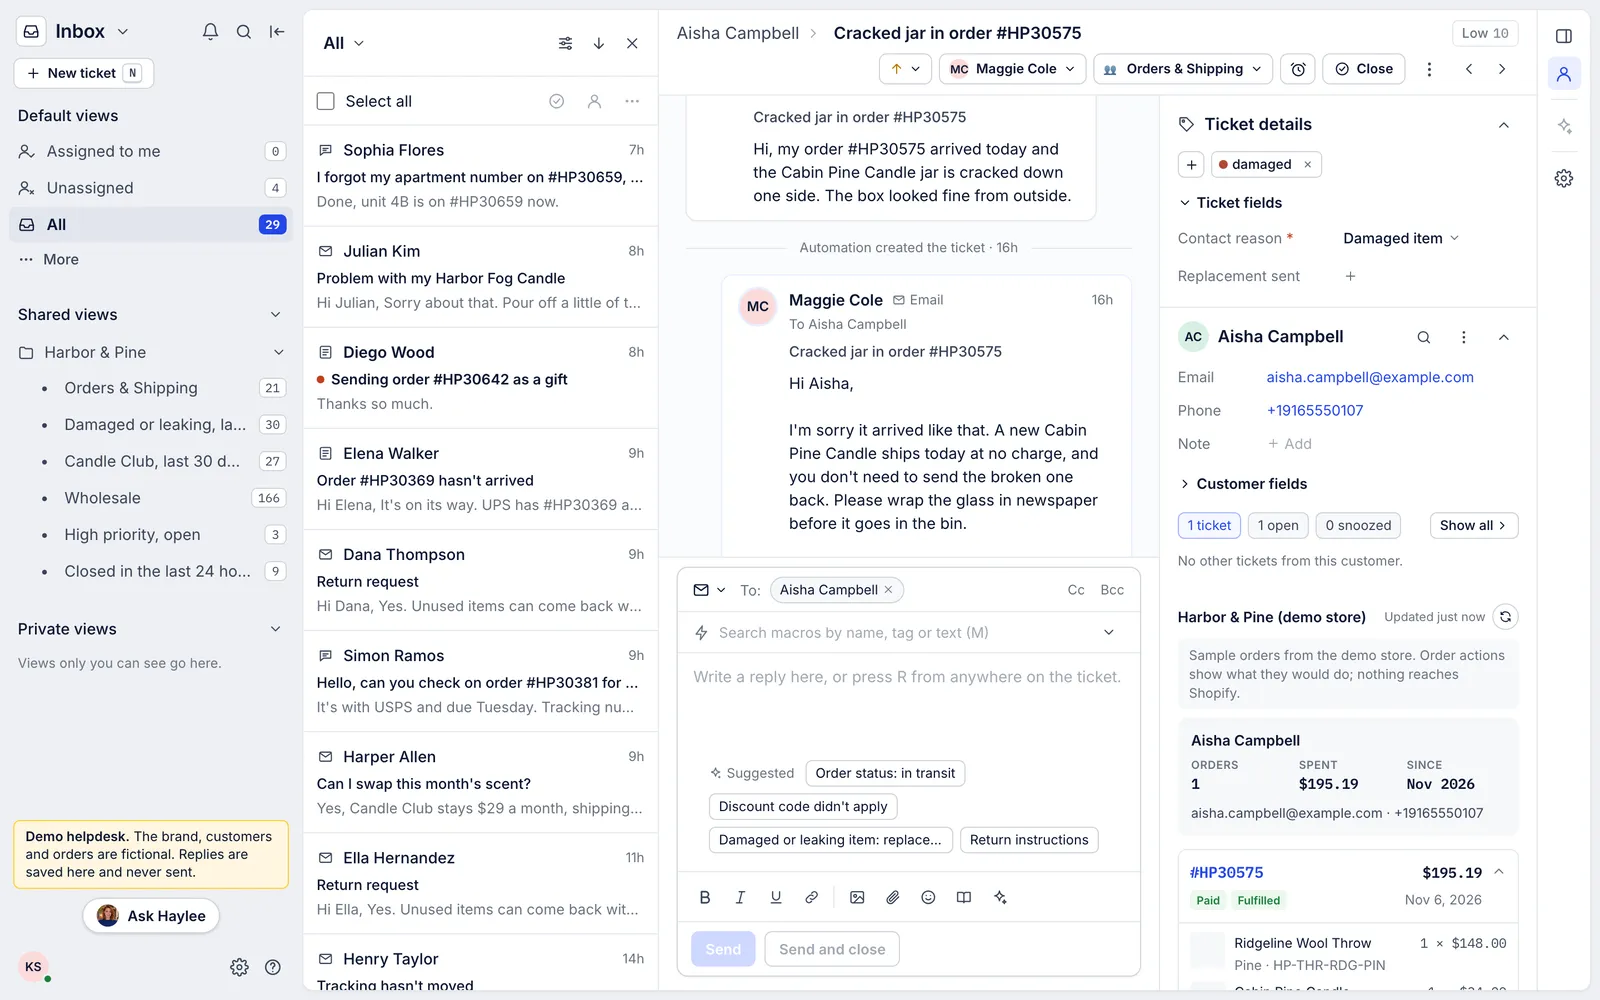
Each row in the ticket list shows the channel icon (envelope for email, speech bubble for chat, form for contact forms), the customer, how long ago the last message came in, the subject and the start of the last message. Some rows carry an urgency label such as Urgent. The helpdesk scores every open ticket from the wording of the message, how long the customer has waited, the channel and tags such as VIP, so the tickets that need you first stand out.
To work through a list from the keyboard, press J and K to move down and up, and Enter to open a ticket. Press ? at any time to see every shortcut.
Go further: The inbox · Views and sections · Search · Keyboard shortcuts
Working a ticket#
The short version: read it, make sure the right person owns it, tag it, reply (usually starting from a macro), and close or snooze it. The full walkthrough video shows a whole working session.
Video coming: Using Growth Dept Helpdesk day to day: a full walkthrough. A working session from the first ticket of the day to the last one closed.
Read the conversation and the sidebar#
The middle of the ticket is the conversation, oldest message at the top. Grey lines between messages record what happened to the ticket, such as "Automation created the ticket" or who assigned it.
The panel on the right holds:
Ticket details: the ticket's tags and its ticket fields.
The customer: email, phone and a note your team keeps about them, their customer fields and their other tickets.
The store: when your Shopify store is connected, the customer's orders with items, payment and fulfilment status, and tracking.
If someone on your team already promised the customer something on this ticket (a refund, a callback), the helpdesk lists that promise with the sentence that made it, so you do not contradict it.
Assign it and set the priority#
Under the subject are buttons for the priority (the arrow: low, normal, high or critical), the agent and the team. Choose Assign to me when you take a ticket. Press A to open the agent list from the keyboard.
Tag it#
Click + under Ticket details, or press T, and pick a tag such as order-status or damaged. Tags feed views, rules and reports, so tag every ticket you work. Often a rule has tagged it already when the ticket arrived.
Reply, and start from a macro#
The reply box sits under the conversation. Click into it, or press R. The To field already holds the customer; Cc and Bcc add more people.
A macro is a saved reply. Search macros in the line above the reply box (or press M) by name, tag or any words in the text, or click one of the Suggested macros the helpdesk picks for this message. The macro fills in the reply with the customer's details, and it can also tag, assign or snooze the ticket when you send. A line above the text tells you what the macro will change on send; remove it there if you do not want that.
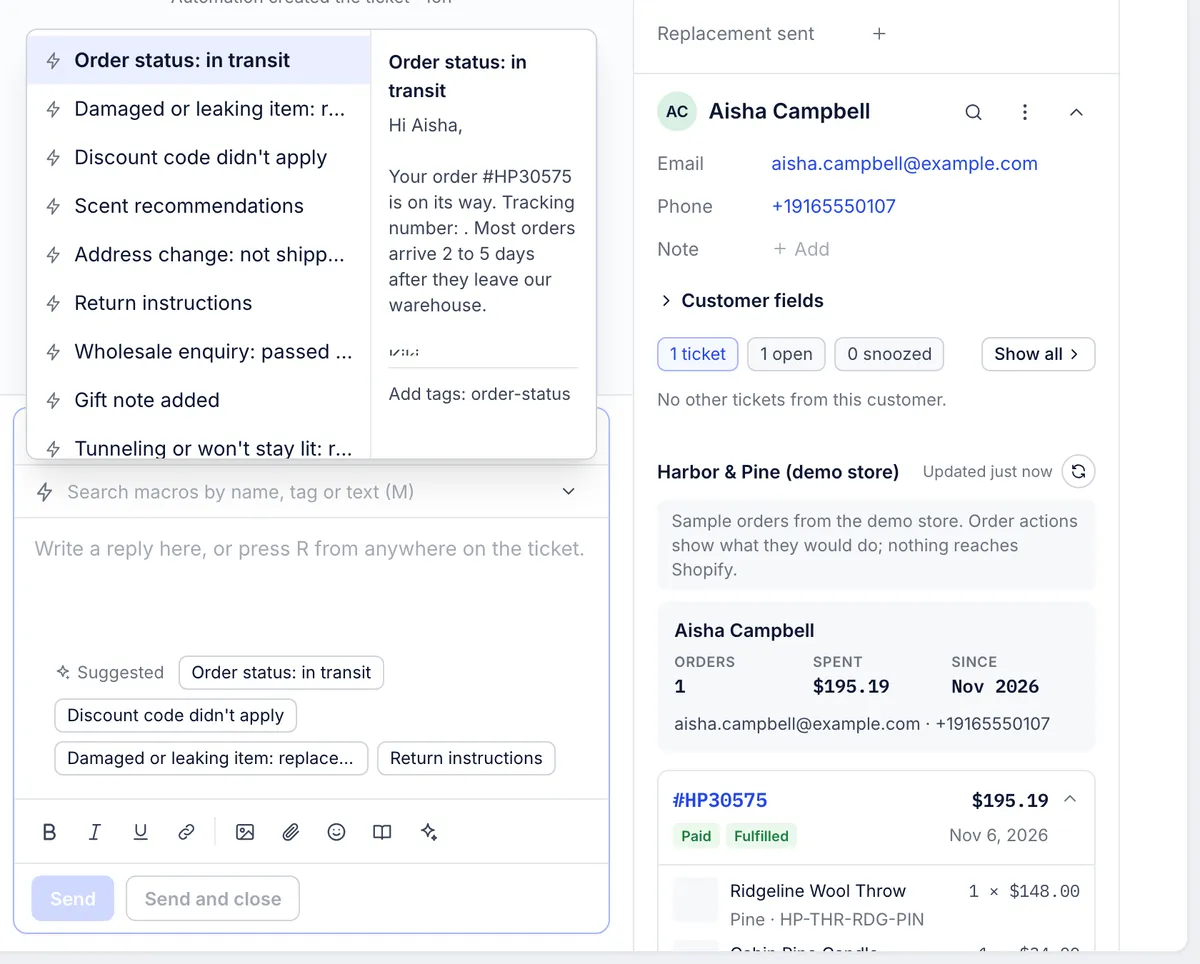
Read the reply before you send it. Edit anything that does not fit this customer, then press Send, or Send and close if nothing more is needed. From the keyboard: ⌘ Enter sends and ⌘ Shift Enter sends and closes (use Ctrl on Windows).
The toolbar under the text adds bold, italic, underline, links, images, attachments, emoji and links to your help center articles.
Use a drafted reply#
When drafted replies are on for your helpdesk, or when Haylee has drafted one, a draft appears in the ticket's draft panel, marked with who wrote it. Read it, check anything it flags for you to confirm, then choose Insert into reply and edit it like any other reply. A draft is never sent on its own; a person always sends it.
Write an internal note and mention a teammate#
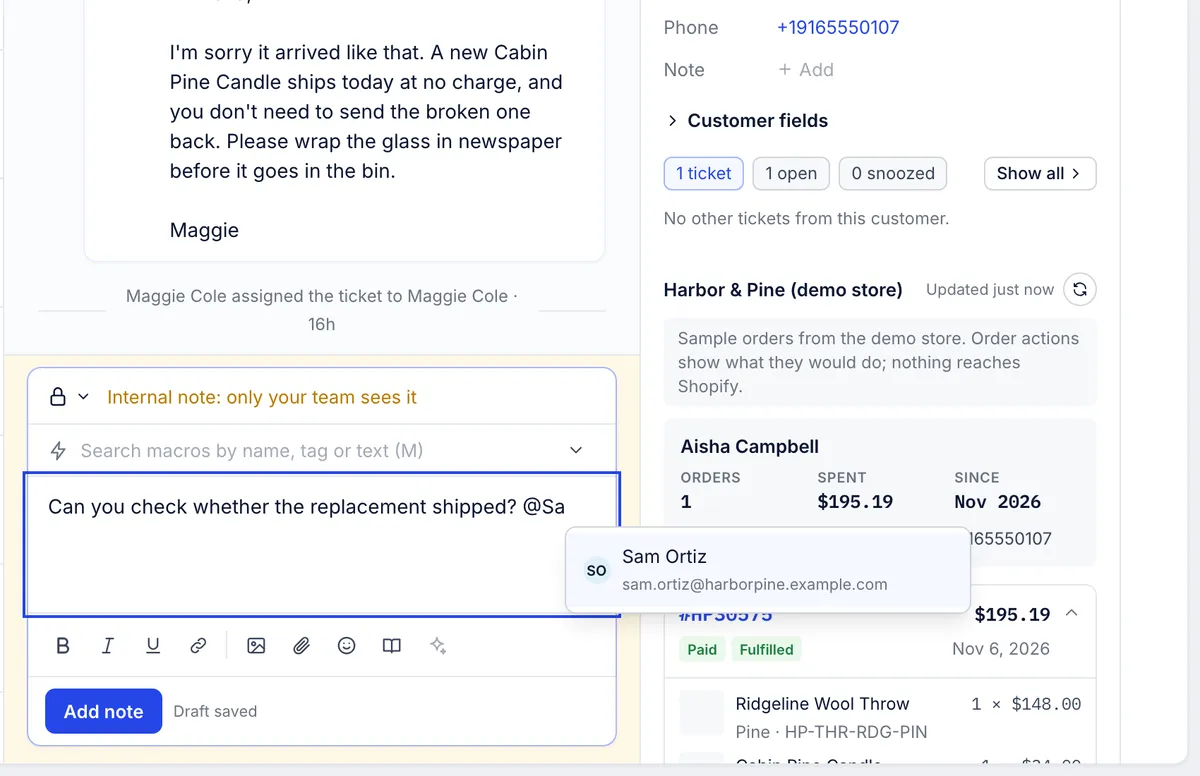
To ask a teammate something without the customer seeing it, switch the reply box to Internal note: open the menu at the left of the reply box (the envelope) and choose Internal note, or press I. The box turns yellow, and the note stays inside your team.
Type @ and a name to mention someone. They get a notification, and an email if they have that switched on.
The same menu has Forward, which sends the conversation to someone outside the helpdesk by email, such as a warehouse or a supplier.
Snooze it while you wait#
If you are waiting on something, such as a carrier or a reply from your warehouse, snooze the ticket: the alarm clock button beside Close, or B. Pick a preset between one hour and one week, or choose your own date and time.
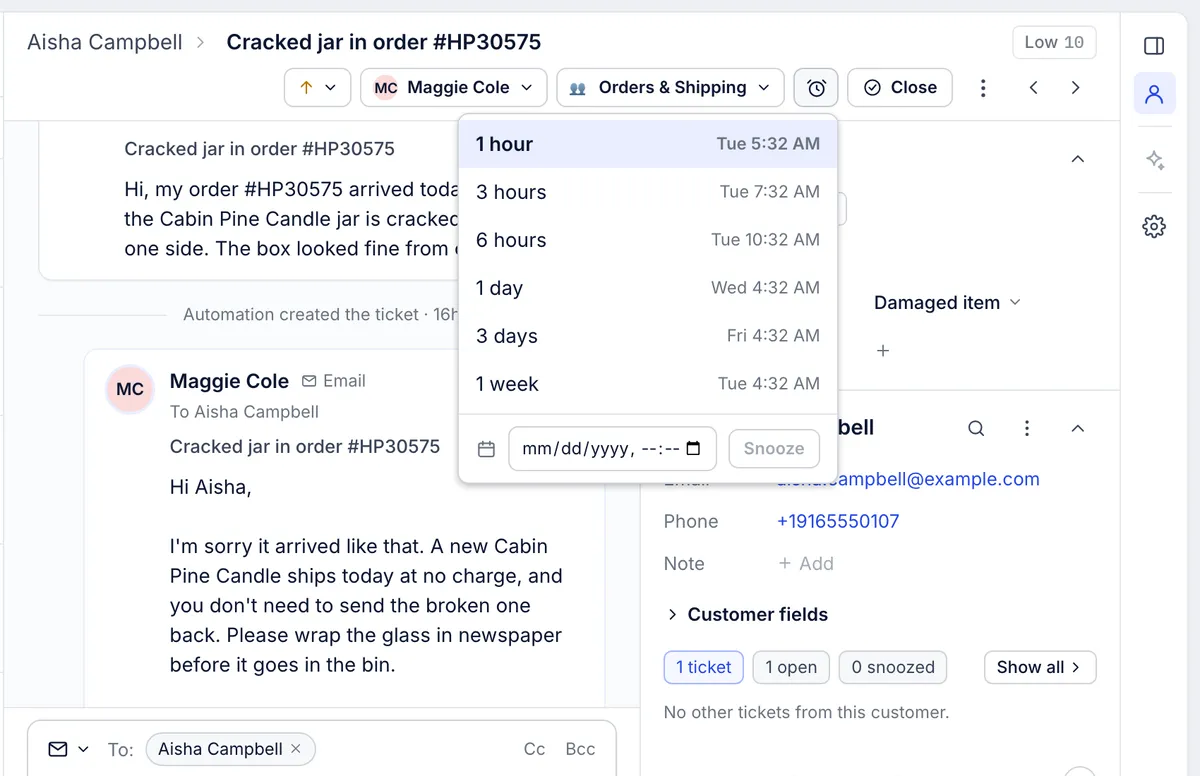
A snoozed ticket leaves your open views and comes back on its own at the time you chose. If the customer writes in first, it comes back straight away. Your snoozed tickets are listed under More > Snoozed.
Close it#
When the customer has what they need, click Close or press C. If the customer writes again, the ticket reopens by itself. Some ticket fields must be filled in before a ticket can close; the helpdesk tells you which.
The ⋮ menu beside Close has the rest: merge it into another ticket from the same customer, mark it unread, show every event, copy its link, print it, mark it as spam or move it to the trash.
Go further: Work a ticket from first read to close · Assign tickets · Internal notes and mentions · Snooze · Merge tickets · Act on many tickets at once
Customers#
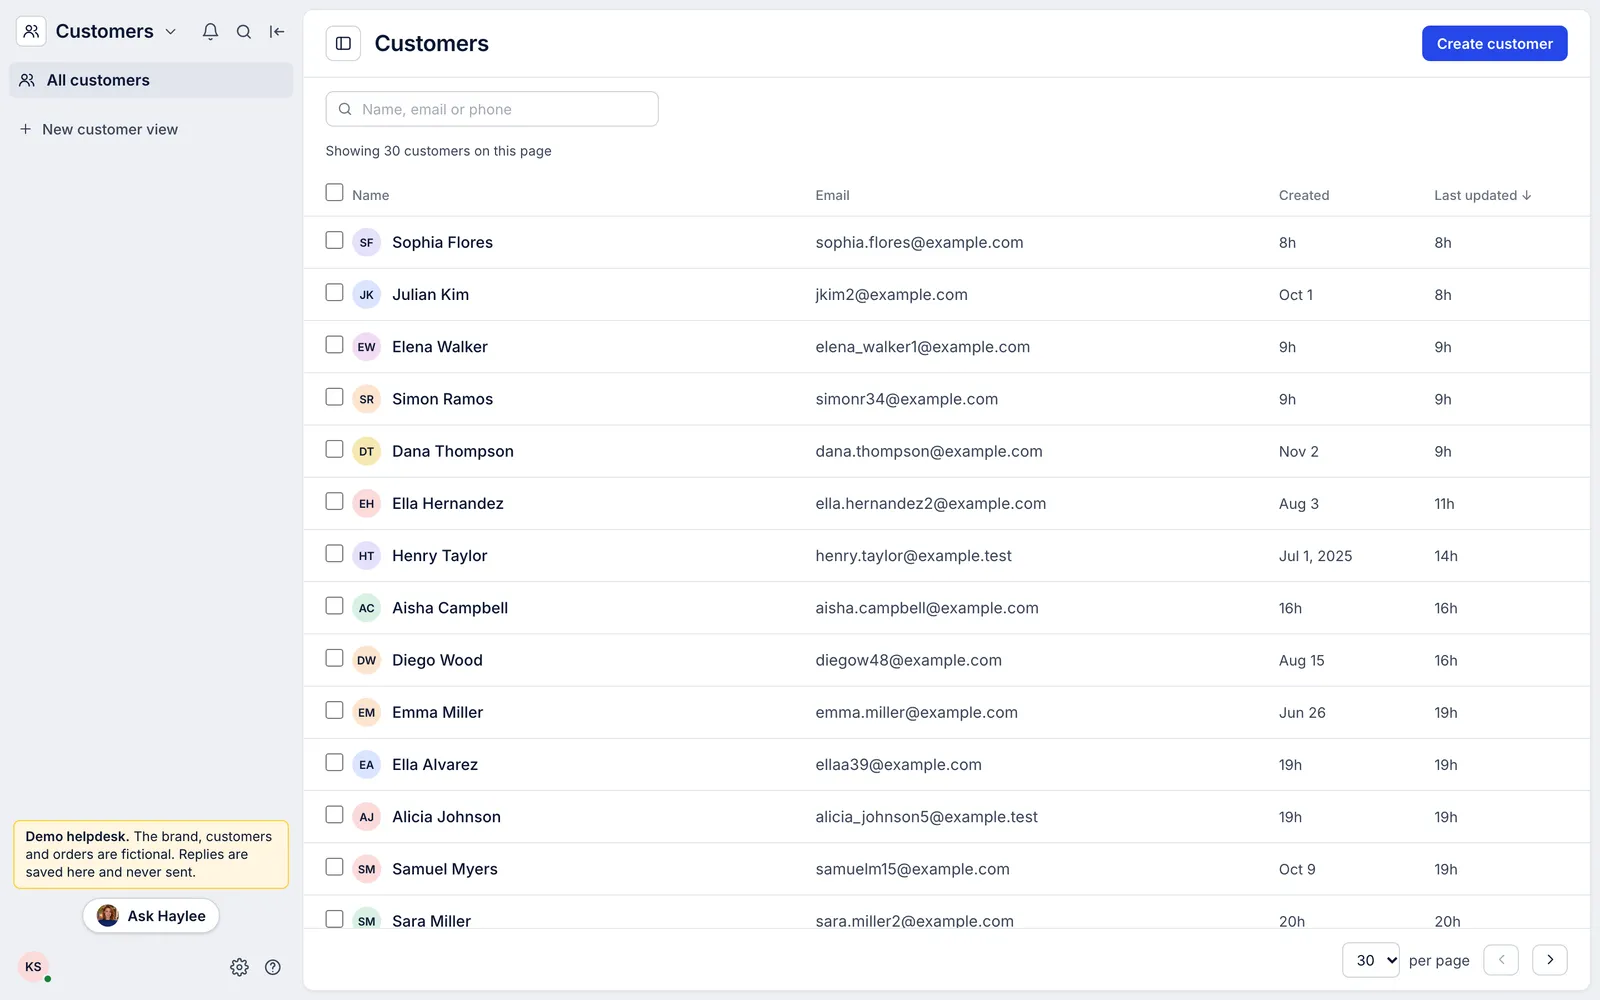
Customers in the top-left menu lists everyone who has written in. Search by name, email or phone, or press / anywhere to search tickets and customers at once.
A customer's page shows all of their tickets, newest first, and the same profile panel you see on a ticket: contact details, the team's note, customer fields and their store orders. If one person shows up as two customers (say, a work email and a personal email), open a ticket of theirs and choose Merge with another customer from the customer panel's ⋮ menu. You pick which name, note and email to keep, and the other customer's tickets and messages move across.
Go further: Customer profiles · Merge customers · Customer fields
Ticket fields#
Ticket fields record facts about a ticket, such as why the customer wrote in or whether a replacement went out. They appear under Ticket details on every ticket. Admins set them up in Workflows > Ticket fields.
A field can be text, a number, yes/no, a date or a dropdown, and dropdown choices can have sub-choices. Each field is optional, required before the ticket can close, or required only when another field has a certain answer (set under Field conditions). Fields are archived rather than deleted.
5. Setting up ticket fieldsGo further: Ticket fields
Tags#
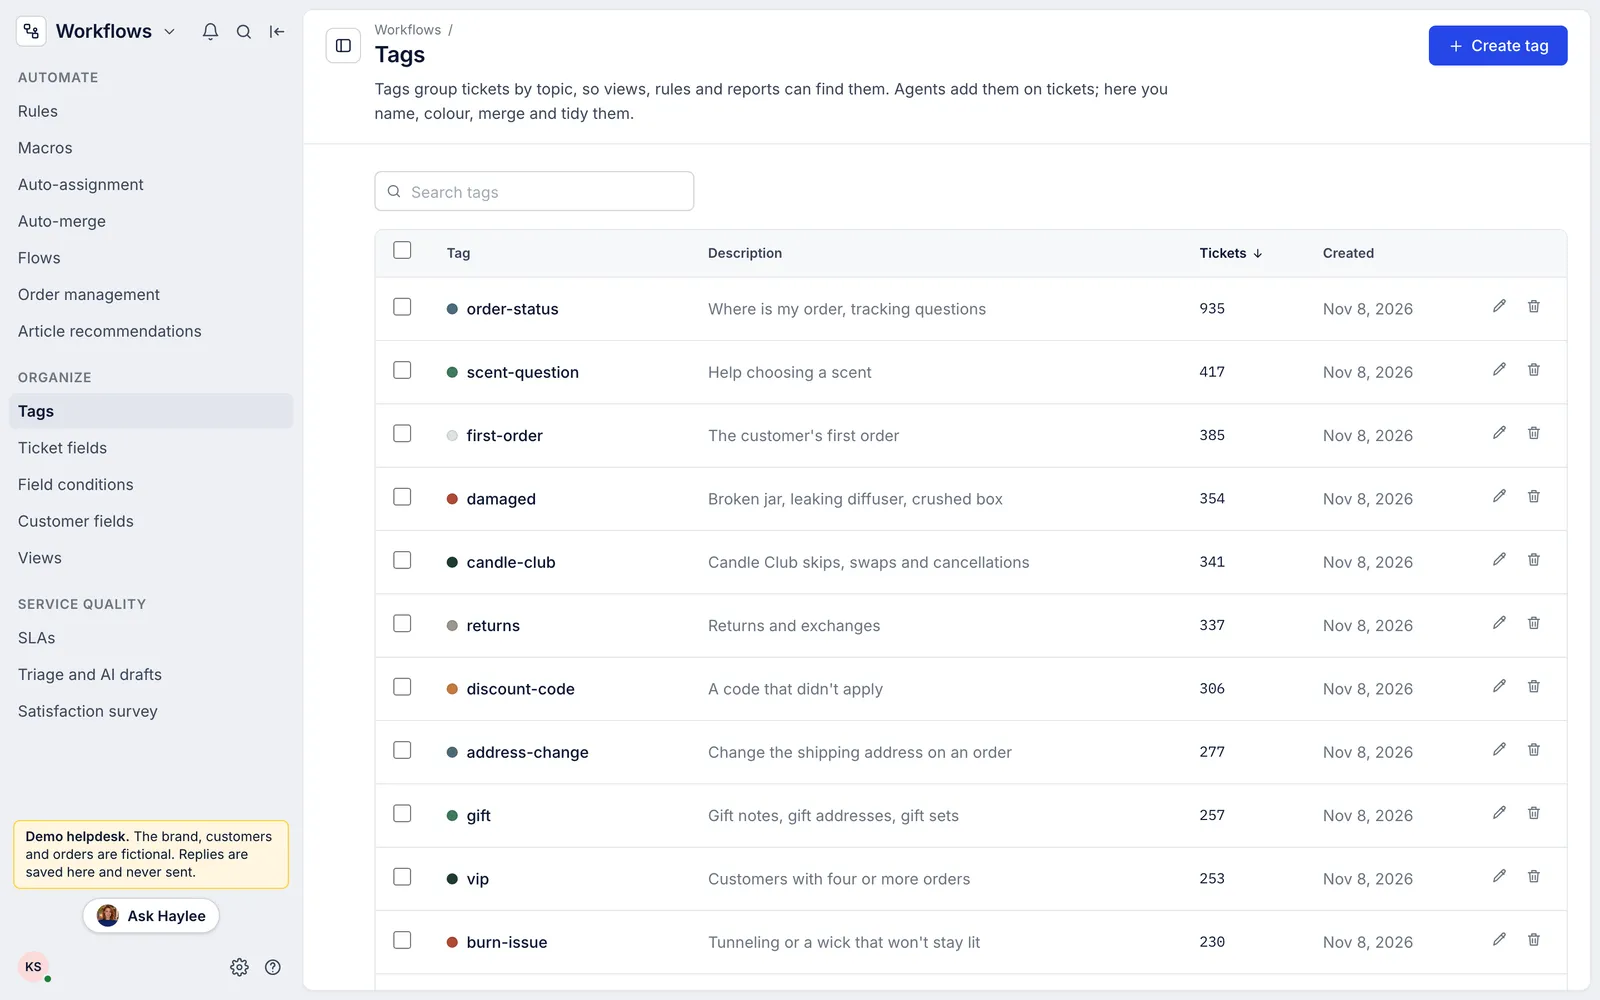
Tags group tickets by topic. Agents add them on tickets, and rules and macros add them automatically. Admins manage the list in Workflows > Tags: give each tag a clear name and a short description, pick a colour, merge two tags that mean the same thing, and delete ones nobody uses.
Keep the list short enough that everyone tags the same way. A small set of tags used every time tells you more than a long list used now and then.
 6. Setting up tags
Go further: Tags
Macros#
Macros keep your answers fast and consistent. Find them in Workflows > Macros, where you can search, filter by tag or language and sort by how often each is used.
To make one, choose Create macro and:
Name it so agents find it by topic first, for example "Returns: send the label".
Write the reply. Use Insert variable to add details that are filled in from the ticket, such as the customer's first name or the order number. A variable with nothing to fill in is left blank, so read the preview.
Add actions if the macro should also change the ticket when it is sent: add tags, set a status or priority, assign an agent or team, snooze, set a ticket field or add an internal note.
Save it and try it on a ticket.
7. Creating macrosGo further: Create and manage macros · Variables in macros · Macro actions
Rules#
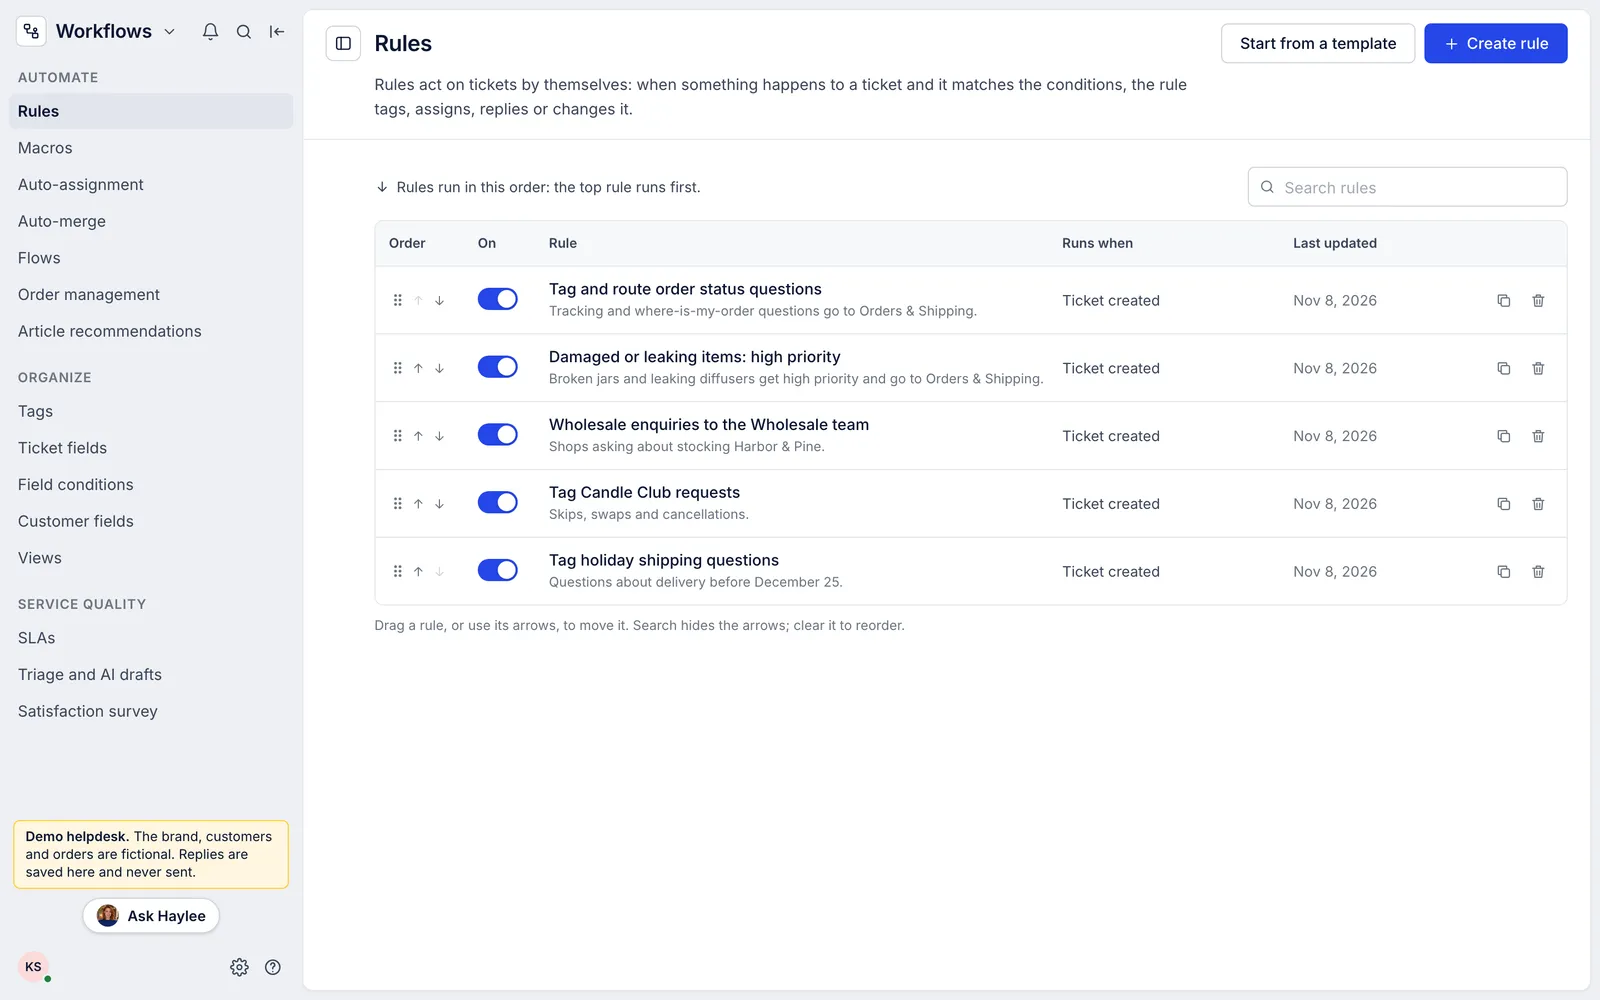
Rules act on tickets without anyone opening them. Every rule has three parts:
When: the event that makes the rule look at a ticket: a new ticket, a change to a ticket, or a new message on it.
If: the conditions the ticket must match. They can look at the ticket (its channel, subject, tags or priority), its ticket fields, the customer and their fields, or the message (what it says and who sent it). With no conditions, the rule acts on every ticket the event brings in.
Then: what it does: add or remove tags, set status or priority, assign an agent or team, snooze, apply a macro, send a reply, add an internal note, set a ticket field, change the subject or skip the satisfaction survey.
Rules run in the order shown on Workflows > Rules, top first; drag a rule to move it. A rule that is switched off keeps its place and does nothing. Start from a template gives you common rules to adapt, and Show the code shows the same rule as text for anyone who prefers to read or edit it that way.
 8. Creating rules
Go further: How rules work · Rule conditions and actions · Rule templates
The AI Agent and Haylee#
Haylee is Growth Dept's AI support agent. In your helpdesk she drafts replies for your team to send, adds internal notes, tags and sorts tickets, and writes skills from the way your team already answers. She works through her own account and API key, so everything she does shows her name in the ticket history.
The AI Agent area is where you decide how she works.
Skills#
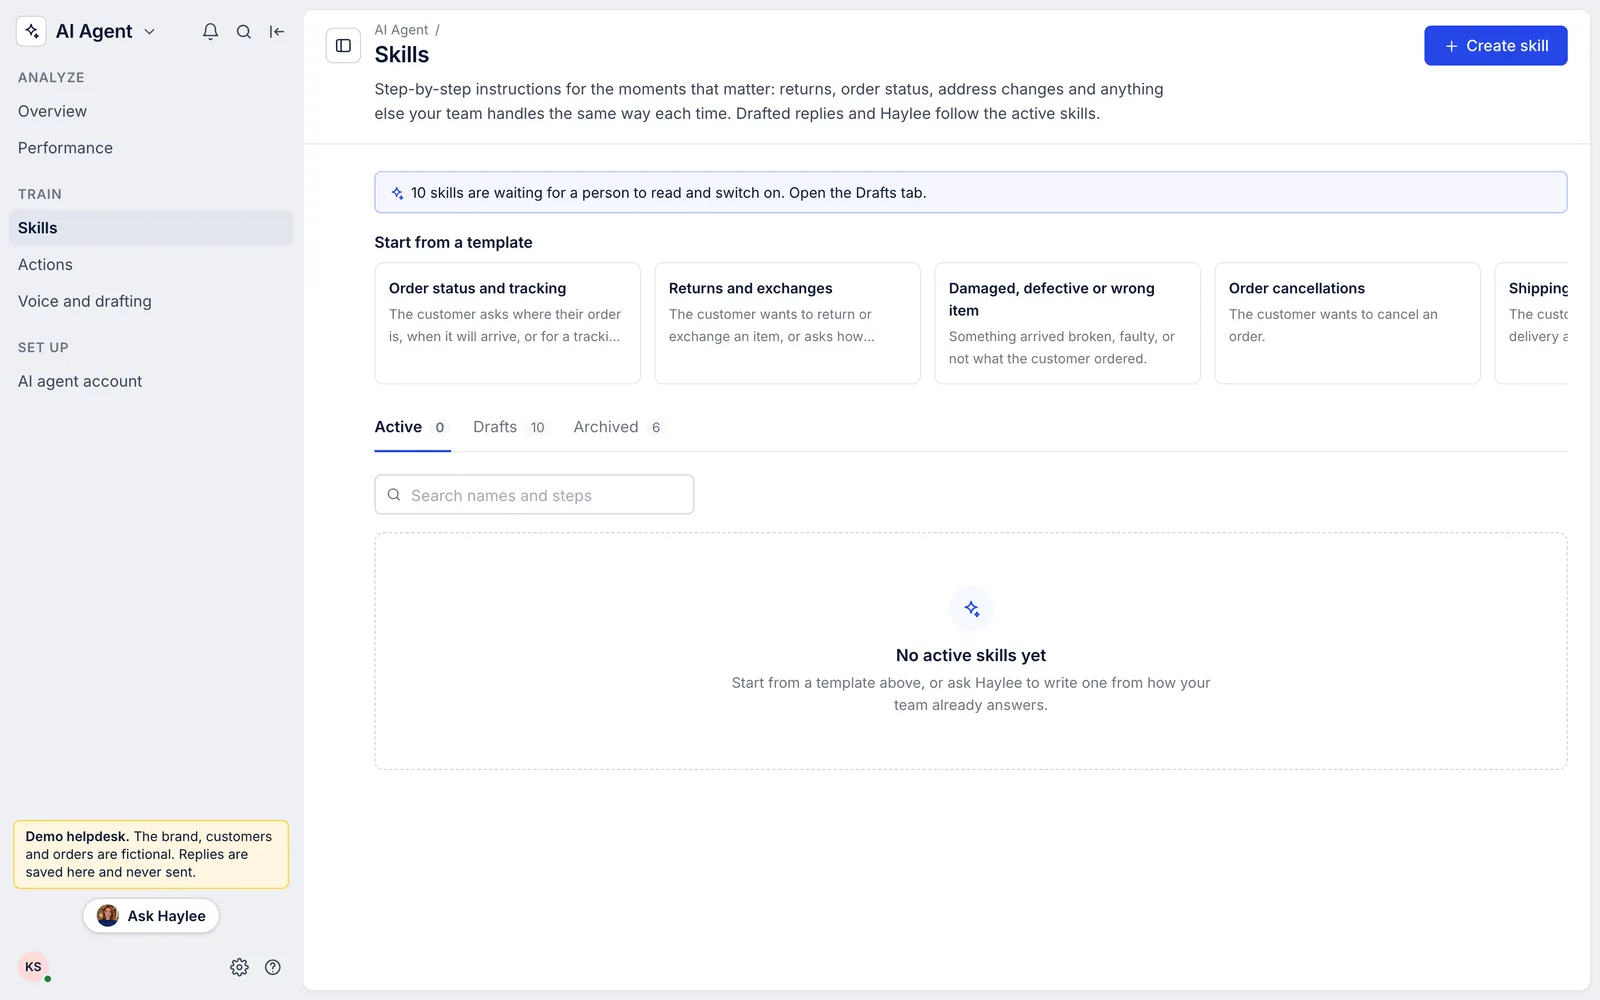
A skill holds step-by-step instructions for one situation your team handles the same way every time, such as returns, questions about where an order is, or address changes. Drafted replies, Haylee's included, follow the skills that are switched on.
Create one from AI Agent > Skills, either from a template (order status, returns, damaged items, cancellations, address changes, refunds, lost parcels, discount codes, subscriptions and product questions) or from a blank page. Fill in the parts in square brackets with your own policy before you switch it on.
Skills Haylee writes start as drafts marked as waiting for you. A lead agent or admin reads each one and switches it on. If she suggests a change to a skill that is already on, the current version keeps working until someone accepts her change.
 2. Skills for Haylee, your AI agent
Actions#
AI Agent > Actions lists what Haylee can do in the helpdesk and in your store, and for each one whether she does it herself, asks a person (by leaving an internal note saying what she would do), or never does it. Out of the box, anything that reaches the customer or moves money asks a person, and sending a reply on her own is off.
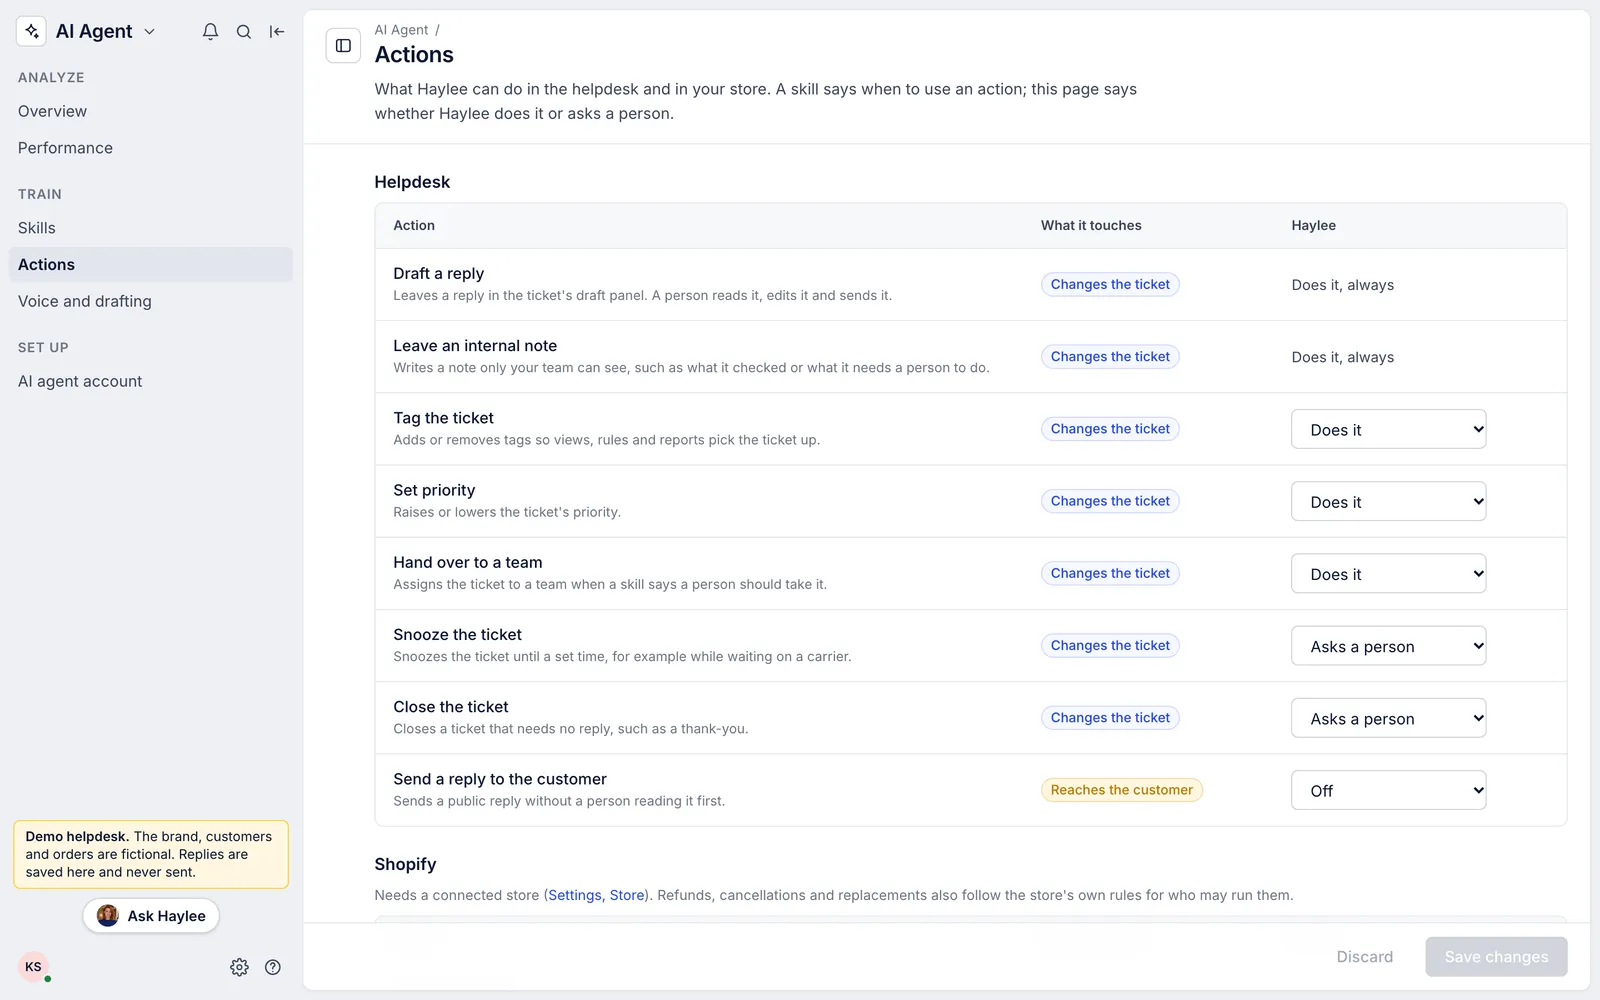 3. Actions for Haylee
Ask Haylee to build things for you#
You do not have to set everything up by hand. Ask Haylee in your team's Slack channel for a macro, a view, a rule, a tag or a ticket field, and she builds it in the helpdesk for you to check. A rule she makes is saved switched off and a field she makes is optional, so nothing changes for customers or agents until an admin turns the rule on or makes the field required. She never deletes anything.
You can also ask her from inside the helpdesk: Ask Haylee at the bottom of the left sidebar opens a conversation. Type a question or a request and send it; her answer appears in the same panel once she has worked on it. Only you see the questions you ask there.
The two walkthroughs below show how she works with your team.
Video coming: Haylee builds it for you. Asking Haylee in Slack for macros, rules, tags and fields, and checking what she made.
Video coming: How Haylee works in your helpdesk. Haylee's own account and key, her drafts, notes and skills, and where to review them.
Go further: How the AI Agent works · Haylee · Skills · Actions
Analytics#
Analytics shows how support is going. The pages you will use most:
Live view: open, unassigned and snoozed tickets right now, the oldest open ticket, and open tickets by agent and by channel. It refreshes every 30 seconds.
Overview: tickets created, replied to and closed, messages, median first response and resolution times, one-touch rate and the average satisfaction score, each compared with the period before.
Agents, Channels, Tags, Satisfaction, Busiest times and Help center: the same numbers split another way.
Automation and AI agent: what was handled without a person, how many drafts were used and which skills they followed.
Filter any report by date range, channel, tag, agent or team, count business hours only, and export the numbers as a CSV file. Metrics glossary explains how each number is counted.
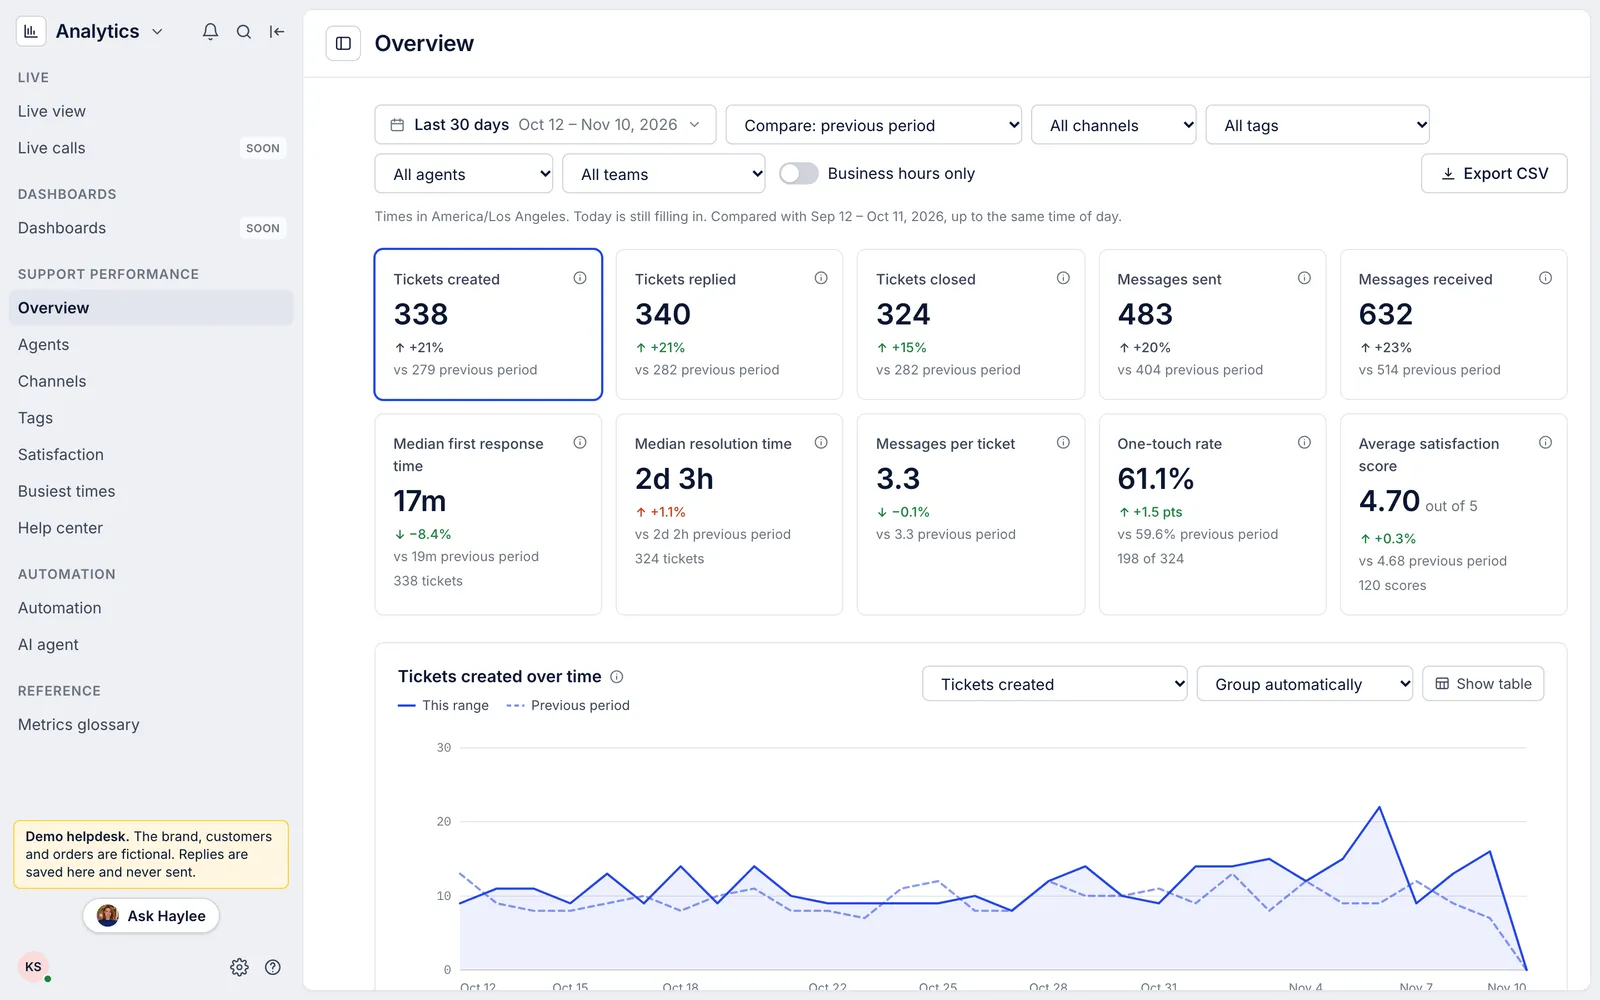 4. Analytics for AI and automation
Go further: Analytics overview · Live view · How each metric is counted
Where to get help#
Press ? in the helpdesk for the keyboard shortcuts.
The ? button at the bottom left of the helpdesk links to these guides, the REST API reference and Growth Dept support.
Ask Haylee, next to it, answers questions about your helpdesk and builds macros, views, rules, tags and fields for you to check.
Search the help guides for a task, for example "merge customers" or "connect Gmail".
Developers: the REST API reference covers every endpoint.
Email support@growthdept.ai and a person on the Growth Dept team will answer.
Still stuck?
Write to the Growth Dept team and a person answers. Say which helpdesk you work in and what you were trying to do.