Customer profiles
Partly availableFind, create, edit and delete customers, keep a private note on each one, and read a customer's page with their tickets, details and orders.
On this page
Every ticket belongs to one customer, and each customer has a profile: their name, email addresses and phone numbers, a note your team writes, customer fields, all of their tickets and, with a store connected, their Shopify orders. You see the profile in the right-hand panel of every ticket and on the customer's own page.
Most profiles appear on their own. When someone emails you, starts a chat or sends a contact form, the helpdesk finds the profile with that email address or makes a new one; How tickets find their customer explains the details. Profiles also come from agents starting a ticket to a new address, from Create customer, from moving your history over from another helpdesk, and from the REST API.
The helpdesk does not copy your Shopify customers into the list: a shopper appears once they write in or someone creates them. Importing customers from a CSV or spreadsheet file is not available either; create them one at a time, or have a developer add them in bulk through the REST API.
Find a customer#
Choose Customers in the top-left menu. The list shows each customer's Name and Email, when the profile was Created and when it was Last updated, with the most recently updated first. Select Created or Last updated to sort by that column, and select it again to reverse the order. The menu at the bottom sets 10, 20, 30, 50 or 100 customers a page, and the arrows move between pages.
Type in the search box above the list and press Enter. It matches part of a name, part of any email address or phone number on the profile, or a whole external ID, and needs at least two characters. Phone numbers match only as they were saved: 9165550107 finds a customer saved as +19165550107, but (916) 555-0107 does not. Clear search takes you back to the full list.
To look up tickets and customers together from anywhere, press /. See Search tickets and customers.
The customer's page#
Select a name in the list, or the customer's name on any ticket, to open their page.
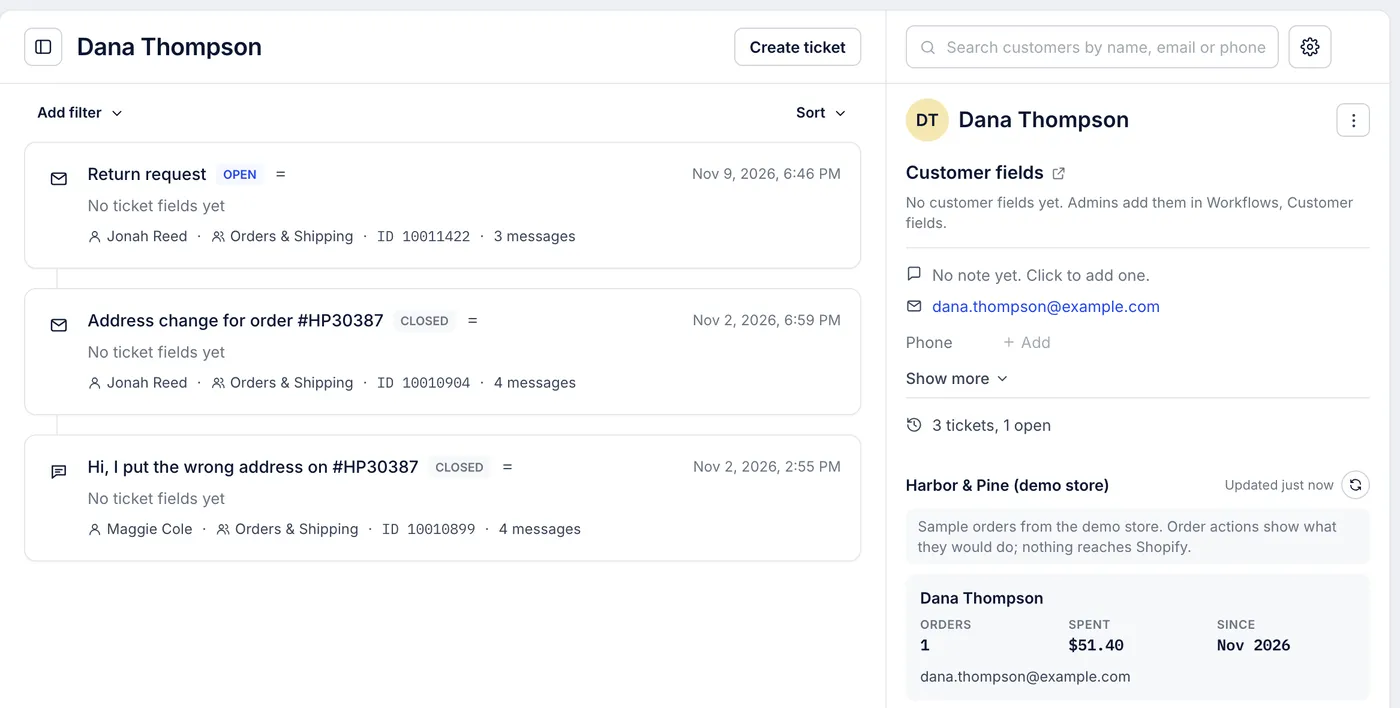
The left side lists the customer's tickets as cards, newest first. Each card shows the subject, status, priority, when the ticket started, any ticket field answers, the agent and team, the ticket ID and the number of messages. Use Add filter to show only open, snoozed or closed tickets, or one channel when they have written in more than one way. Sort puts them newest first, oldest first or most recently updated first. Create ticket at the top starts a new ticket to this customer.
The right side is the profile:
A search box to jump straight to another customer's page.
The name, with a ⋮ menu: Open the customer page, New ticket for this customer, Timeline (every ticket in date order) and Merge with another customer.
Customer fields, with a link to where admins set them up. See Customer fields.
The note, their email addresses and their phone numbers.
Show more, which adds when they became a customer, their language and time zone, an external ID from another system, and the customer ID.
How many tickets they have and how many are open or snoozed.
With a store connected, their Shopify customer and recent orders. See Orders beside each ticket.
On a ticket, the same profile sits in the right-hand panel under Ticket details, with the customer's other tickets underneath. See a customer's history from a ticket covers that panel.
Create a customer#
Go to Customers and select Create customer.
Enter a Name if you know it.
Enter an Email, a Phone number, or both. One of the two is required.
Select Create. Their page opens.
Two customers cannot share an email address or phone number. If another profile already has the one you entered, the helpdesk refuses and tells you which customer number holds it; open that one instead, or merge the two. Creating a customer here does not create one in Shopify.
Edit contact details and the note#
Contact details are edited from a ticket's customer panel:
Select an email address to Write to this address, Copy it, Edit it or Remove it.
Select a phone number to Call it, Copy it, Edit it or Remove it.
An empty Email, Phone or Note row shows + Add.
Type the change and press Enter, or click elsewhere, to save it. When you edit the customer's main email address, the new one becomes the main address, which new replies go to.
On the customer's page, + Add fills an empty email or phone row, and the addresses that are there open your mail app or phone. Changing or removing an address works from a ticket's panel only.
A profile can hold several email addresses and phone numbers, but the panel only adds an address to an empty row. A second address arrives when you merge two customers or through the REST API.
The note#
The note is for your team only: customers never see it. Use it for things every agent should know before replying, such as "Prefers phone calls" or "Wholesale buyer, invoices go to accounts@".
Select the note, or + Add on a ticket, or "No note yet. Click to add one." on the customer's page. Type, then click elsewhere to save. A note can be up to 10,000 characters and keeps its line breaks. It stays in the helpdesk and is not copied to the customer in Shopify.
Delete customers#
Go to Customers and tick the box beside each customer to delete. The box in the header ticks everyone on the page.
Select Delete and confirm.
Deleting erases the customer and everything tied to them: their tickets with every message, the messages they sent on other customers' tickets, their attachments and their customer field values. It cannot be undone. If other profiles were merged into this one, they go too. Delete is on the list only, not on the customer's page.
When a customer asks you to erase their data, follow Customer data and privacy.
Customer views#
Saved customer views appear under All customers in the Customers sidebar. Each one lists the customers that match its filter, such as a language, a customer field value or an address domain. Your helpdesk may not have any yet.
Making a new customer view in the app does not work yet: the New customer view link opens the editor for a ticket view. A developer can create one through the REST API (POST /api/views with type set to customer-list); it then shows in the sidebar.
Who can do what#
| Role | Customers |
|---|---|
| Observer | Search and read customers and their pages |
| Lite agent, basic agent, agent, lead agent and admin | Also create, edit, merge and delete customers, write notes, fill in customer fields and change a ticket's customer |
| Admin | Also create and manage customer fields |
Related articles
- Merge customersJoin two profiles of the same person into one, choose which name, note and emails to keep, and know what to do if you merged the wrong pair.
- Customer fieldsKeep facts about each customer on their profile, such as a membership tier or ring size, and use them in rules and views.
- How tickets find their customerHow the helpdesk picks each ticket's customer from an email address, when it makes a new profile, and how the store section finds the same person in Shopify.
- Customer data and privacyErase a customer's data when they ask, what happens to card numbers and other sensitive details in messages, and how long the helpdesk keeps what.
Still stuck?
Write to the Growth Dept team and a person answers. Say which helpdesk you work in and what you were trying to do.